Wednesday, February 18, 2015

Last Year's Herb Garden

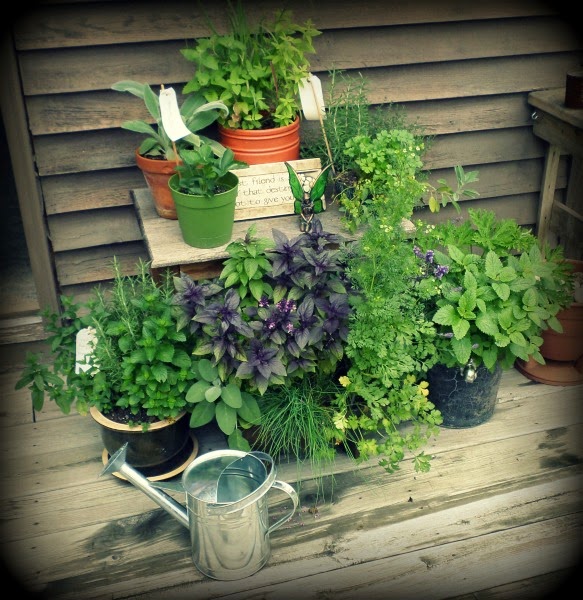
our container garden in the middle of summer, it actually doubled in size from this by the end of August

It may be the winter blues striking, this place is way too grey year round anyway, but I am getting excited to have a container herb garden again. Last year I did a small one but it ended up growing out of control and was so easy to take care of that I'm going to work with more herbs(in terms of quantity of each plant) so I can get more out of it.


By the end of the summer my herbs where almost 4 times their original size and all of the kitchen herbs - at least half of what was planted - were amazing in meals. 


We're planning on giving more berries a try too, all of which were planted and winterized early October. And by winterized I mean we took the advice of Amish friends and through hay on top of them. The raspberries are already good to go and produced 20 pounds of berries for us, not including the hefty amount I was able to give away, and our small strawberry plant did very well by the end of summer. The strawberries were just as easy to take care of and the raspberries were already well established so I didn't have to do anything but freeze those. Also behold our amazing blueberry harvest! The blueberry was a small plant but he was a late bloomer so we didn't get a lot off of him, this year should be better for him though. 

Since I didn't think to start this blog last summer when I could have done more with it in regards to the herb garden I'll be sharing what I've learned and all the new things I'm sure to come across this coming spring and summer. A quick recap of the plants are:

Basil, Catnip, Chamomile, Chives, Cilantro, Citronella, Lavender, Lemon Balm, Lemon Grass, Lemon Verbena, Mint, Oregano, Parsley, Peppermint, Rosemary, Sage, Strawberry, and Thyme 

Chamomile and Lemon Grass did the worst, if you plan on trying those the best I can say is do Lemon Grass in its own planter and maybe plant Chamomile with other flowers - I did the opposite so this is what I'm going to try this year with them in hopes they do better. 

Basil by far did the best and needed the least care - it actually did so well that it more than doubled its size in the course of a few days. We were visiting family and came home to find it over taking the kitchen planter so we moved it to its own planter where it continued to grow like a monster. I ended up letting it get too big too quickly but it became the easiest to dry out for an herbal swag. It also was the only one that dried well enough for said swag so I opted not to finish putting one together because I failed so badly at it. I'll be trying it this year though, just in case I suddenly don't suck at decorating with herbs(herbs make awesome fresh arrangements for centerpieces and gifts by the by). 

Then there are those herbal mosquito repellent planters - those work and they are amazing!! They actually work so well that I'm aiming to set up at least 4 this year if I can. Last year I put 2 together, one which had Lemon Grass, Lemon Verbena and Catnip(which I totally grew for the neighbor's cats who protect our yard so valiantly) and the other had Citronella, Lavender and Lemon Balm. There are more options you can use but I with with these more so as a trial of it and will probably add more of a selection for a more pleasing looking set up in the planters. Beware though that Citronella also does very well with little care and it ended up affecting how well the Lavender and Lemon Balm didn't do; both grew but remained rather small due to lack of space the Citronella allowed them.

We're looking at galvanized tubs to plant in this year, but those can get pricey so here's to finding cheaper and better planter solutions!


This was taken in September, fall was starting and the Lemon Grass, Lemon Verbena and Chives were the only plants to start to dry out before October.


Saturday, February 14, 2015

Cheap Fancy Cake - Lemon Blueberry


There was a tasty looking cake recipe on the ye olde Pinterest for a Lemon Blueberry cake. Everything about it appeared to be made from scratch(extra delicious) but I didn't have time for that. So I cheaped myself a variation of it. 


Here's what you'll need. You can switch out the blueberries from another berry, be mindful though that fresh strawberries like to loose their color in baking(I learned that from making a strawberry cobbler. It still tasted awesome). 


Follow the instructions on the box of your cake mix of choice, though I vote for Duncan Hines because it creates moist, spongy cakes. I layered as I went with this so I could have blueberries on top of blueberries(they sink in the batter while baking). Cake batter/blueberries/more cake batter/rest of blueberries - you can cut out the layering and just toss it all together, it'll still be delicious. 


With the blueberries the cakes were a little more moist than they otherwise would have been, I gave them ten minutes to cool before popping them out of their pans and then let them cool on a cake rack for about an hour. 


Topped off with vanilla icing(I don't like the taste of cream cheese so forget that nonsense) and it's done. There is icing between the layers and since I only had one can of the icing I didn't go too fanciful with the cake decorating. One can of icing is more than enough to compliment the tartness of the lemon cake and blueberries, anymore and it might be too sweet. Which I fully plan on risking next time for the sake of fancy icing decorations. 


And there we go, cheap and simple. I'd like to try the from scratch version someday but for now this one was awesome. AWESOME.


The much more fancy Lemon Blueberry cake recipe can be found here.


Glittered Shoes

This post is going to be more of a product review. For a  costume I need red, sparkly shoes and women's 10 is a hard size to find in fancy/fun shoes and since I don't have time to chance shipping an online order for shoes that will work I was left to making them myself. 

I didn't want to just craft glue a bunch of glitter to a pair of shoes; there's no way I want to have to clean up loose glitter in my sewing nook plus it would be nice to be able to walk in this shoes so I aimed for something that was meant for clothing and could move with clothing, and I found Tulip's line of Fashion Glitters. 


I'm not always a fan of their products; their puff paints are fun to play with on shirts but those usually end up making garments stiff and the paint itself tends to crack. There were plenty of options, the loose glitter that came with appropriate glue, there were spray paint options, I debated the leather paints longer than I should since I was using it for shoes but opted out because of the lacking shiny in those particular paints. Then I came across the super fancy glitters. They only came in one size and I lucked out because there was one red tub left. It is a rather small container of glittered clothing paint that was priced at $5.99 and by the time I finished my shoes I had only gone through half of the container. 


The shoes I used were canvas knock off looking Toms. Pretty simple slip on shoes, nothing else was terribly important about them other than they could pass for the style I needed.


It was pretty simple to do, just paint on and let it dry. I used two soft brushes to get a smoother coating of the paint. The larger brush was for covering large amounts of the shoes at a time and the thinner brush I used to cover the smaller, finer areas as well as do any touch ups. 


This project probably took me about 20 minutes to complete and it didn't take long for this paint to dry. I did clean the brushes as soon as I was do so as not to risk ruining them or making it difficult to clean them at a later time. 


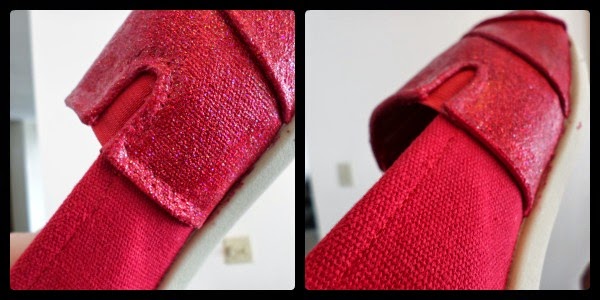
It was hard to get their sparkle to show up well with my camera but they do look better in person. I only needed one coat since these shoes were already red(two coats would have used up all of the paint) and they do have a sort of stiffness to them as a result of the paint. However I was still able to get them on and off easily(they did have elastic in them to begin with) and I had no trouble walking in them. The paint moved well with the shoes and showed no tale tell signs that it would crack. Tulip's Fashion Glitter ended up being a great product to use for this project.


Wednesday, February 11, 2015

Acrylic Paint Stain

Creating a wood stain with acrylic paints is easy to do and great for crafts. Using acrylic paints makes it cheap and gives you a wider variety of colors to use. I used a simple brown paint for this tutorial on a scrap piece of wood for a sign project I'm working on for a gift.

You don't need much to get yourself started. If you are using scrap wood and not a store bought already cut and sanded piece of wood(or box, picture frame, dollhouse pieces, etc.) then you may want to consider sanding it out before you stain it if you think it's needed. My scrap piece of wood was already good to go for this project so I am not including a step on sanding.


Supplies you'll need are:
  • Paint - any color should work, though I have not tried this with glittered acrylics
  • Brush - I used a sponge brush, but really any type of brush will work
  • Water - the amount isn't specific, the more water you use the softer the color and vice versa. The amount used is up to you. 


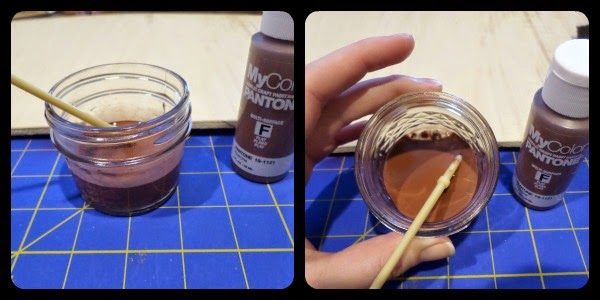
Be liberal with the paint. The brush I used to mix the water and paint was not what I used to paint my board. Remember to check that you mix the paint and water thoroughly, there will be chunks of paint at the bottom of your glass(or whatever you use for your mixture).


Don't be afraid to go heavy with each coat. The wood is going to soak up your stain, and when it dries it will not be as dark as it was when you applied it. The above photo is a comparison of the stain wet and dry.


You'll want to wait for each coat to dry before you apply any more coats. The number of coats you do is again up to you. If you think you've made your stain too light you can either add more paint to your mixture or just apply more coats. If you find you've made it too dark, then aim for fewer coats.


This is my project after three coats of stain. The close up is a better representation of the final color out come. Any more and it would have been too dark for my liking, but this shade is pretty spot on for what I wanted.


On a final note you will need to watch out for your project warping since you are using a water based stain to color it. If you purchased a wooden item to stain it may not be as much of a worry, but wood scraps are scraps for a reason. The piece I used was already slightly warped and after I finished staining it the warping became worse. I did find am alternative use for my thread box and sewing machine however and both are working great at weighing down my board. If you do have a warping issue and you are able to weigh down your project make sure to do so while it's still wet. Using my thread box ensures that if it makes any marks on my drying project I can easily fix it or work with it when I finish painting my board.

I'll link the finished project here later.

***This is my finished project, it was a Harry Potter themed sign I made as a gift for the husband unit. I did a combination of metallic gold, acrylic paint and a gold paint marker from Sharpie to keep the lettering neat(I did go over it with the gold acrylic to match the colors).


Tuesday, February 10, 2015

What to Pack in Your Sewing Kit


Simply put this is a guide of what tools are useful to pack in a travel size sewing kit. It may vary person to person as to what an individual finds more useful to have on hand, and this list is based off of what things were helpful, and what I wish I hadn't forgotten, for costuming at conventions. Cut down on what you need to pack for your cosplays but making your sewing kit neat, small and full of the essentials without the extra 'just in case' items. I'll start with the general basics for a small kit and then move on to the items I wish I had packed on several convention trips.


Start with your box/bag. The size of this is going to determine how well stocked your kit is. For a smaller kit you can find the perfect sized box at your dollar store. Look for the lunch boxes/food containers. This purple box(other colors were also available) is currently on sell, but it most likely is only going to be carried with their spring seasonal items, however back to school sales(pencil/crayon boxes) are also a good route to go, as well as cosmetic  and travel bags.

If you don't already have tools and supplies on had you can always grab a small, and cheap, travel kit but these kits are really limited(don't be fooled by the assortment of thread colors) and really aren't made to last. Better options for your starter kit are to go with either the Dritz Start-to-Sew Kit or Singer's 1512 Beginners Sewing Kit. These kits include a sewing gauge(both), tracing paper and a tracing wheel(Dritz), and a needle threader(Singer). A sewing gauge, tracing paper and a tracing wheel may not be particularly necessary in your travel kit but they are very useful to have at home. A needle threader is also not particularly necessary unless you have a harder time threading your needles, then you'll want one around. There are of course more starting kit options you can go with, but these two are fairly basic and not necessarily overstocked with items that would be more useful at home. 

Items you'll want to have in your kit:
  • Hand Needles - have a small assortment of sizes
  • Pins - colored, ball point pins are easier to spot when dropped versus straight pins
  • Pin Cushion/Pin Box - keep those devils together!
  • Safety Pins
  • Seam Ripper
  • Scissors - if you can fit a regular sized pair of scissors go with embroidery scissors(or both!)
  • Buttons
  • Hook and Eyes
  • Thimble
  • Band Aids - pins suck
  • Measuring Tape
  • Thread - stock white and black thread since they're easier to pick from for small fixes, but if you have spare room don't forget to include thread that matches your clothes/costumes

That is the very basic you'll want for your sewing kit, however here are the items I've been able to learn the hard way are really good to have on hand for conventions:
  • Tailor's Chalk
  • Markers 
  • Elastic - I aim for at least two sizes
  • Hem tape - you will need an iron to use this, but it's amazing
  • Liquid Stitch - this is available in a variety of options for different fabric needs
  • Fray Check
  • Crafters Glue - Tacky glue can dry quickly and can be used on almost anything
  • Velcro
  • Tape - while masking tape and scotch tape(double sided) are good ideas, duct tape is very handy as is fabric tape(double sided hem tape). For taping down costumes to skin try Hollywood Tape.
  • Paper - small journal, post its...
  • Pen/Pencil - these last two bullets are not so much for sewing purposes but are still good to have on hand

These items will give you a much more thorough sewing kit and have you ready for any clothing/costume/prop emergency, and of course for those last minute stitches Friday night at conventions. Now let's talk a little more about a few things.


 Tailor's chalk/pencils! Also know as Dressmaker's pencils/markers, you have a few options for this, you can get the chalk(the squares), pencils or markers(not pictured). In my experience the pencils have not worked well, the markers do well however if you have to make some marks for quick fixes before an event you will not be able to get the marker off of your attire. Chalk works best, it's easiest to see and easiest to remove without using water. While I do think Tailor's Chalk works well, I still keep regular chalk on hand since it's just as easy to remove from most fabrics. Pro tip: a white crayon works surprisingly well on the wrong side of fake leather and suede. If you have to draw out your costume design because a pattern isn't available, white crayons can come in handy if you don't have tailor's chalk. 


 Markers! Sharpies come in a variety of colors and are great for quick fixes on just about anything, plus they are available as paint markers which is great for your props. You can also look into getting fabric markers if you need to do touch ups on your costumes. 


Meet: Hem Tape. This stuff is amazing and you'll want it in every size ever. On a realistic note hemming anything sucks and if you're in a crunch for time hem tape is quick and easy. You will need an iron to fuse it to your fabrics but you can have your garment hemmed in the time it would have taken you pin and swear about sewing it. When you're picking out your hem tape(also known as stitch witchery) keep an eye out for water safe hem tapes. If you're using it on a costume that you won't be able to just toss in the washer then you're pretty well set for whatever size will meet your needs. This goes for heat fusible interfacing: some interfacing you will have to sew in place but if you're opting for a heat fusing one then you'll need to keep in mind that they aren't all safe to be washed; this should be marked on the label. 

On the subject of irons, since I'm such an advocate of taking the easy way out with hems, if you can bring your own iron with you to conventions, do it. Chances are the irons that are available in hotel rooms are not maintained or properly used, are most likely filthy and tend to be 50/50 if they're going to burn or ruin your fabric. If you are left with what's available to you at a hotel make sure you aren't using it on the right side of your clothing/costumes' fabric. Applying it to the wrong side saves you from the risk of leaving an unsightly stain, mark or burn on the good side of whatever you're ironing. 

On one last note I'd recommend looking into the Dritz No Sew Kit - this kit includes the Stitch Witchery, fabric tape, Liquid Stitch, Fray Check and a small amount of pins. I usually find it on sale at my go to fabric store. 

Anything else you include in your own kit? Feel free to share in the comments!

Monday, February 9, 2015

Scent Pairings


These scent pairings are based on what is available at The Witches Hearth Shop but these should work well with other brands' wax melts and with oils(if they are available in these or similar scents). 

  • Apple Spice Cake/Spice Tea - enhances the spice tones in the cake scent
  • Bayberry/Oak Moss - creates a strong earthy/woodsy scent, is very masculine
  • Dragon's Blood/Vanillawood - while both have a tone of earthy/woodsy to them, the sweetness of Vanillawood complements the musky and spicy notes in Dragon's Blood
  • Leather/Oak Moss - creates a subtle and pleasing musky scent
  • Orange Blossom Honey/Spice Tea - tea and honey without making the tea too sweet
  • Rosemary Mint/Lavender Chamomile - this creates a perfect herbal garden mix, add citrus to it by switching Lavender Chamomile out for Lemon & Lavender
French Vanilla Pairings:
  • Butterscotch Sandies - soften the strength of butterscotch without loosing the sweetness of the scent
  • Hazelnut Brew(coffee) - mix vanilla and coffee to mimic a latte
  • Spiced Rum - this is already a rich and warm scent, but paired with French Vanilla it becomes more smooth with a hint of sweetness
  • Sugar Cookie - a simple and creamy scent mix
  • Ylang Ylang - softens the strength of this floral
Sugar Cookie Pairings:
  • Butterscotch Sandies - lessens the candied scent while creating a stronger cookie scent
  • Lemon & Lavender - this excellent pairing mimics Victorian shortbread tea cookies
  • Spice Tea - creates a sweet and spicy cookie


Sunday, February 8, 2015

The Lego Cake Experiment

Recently I tried my hand at making one of those Pinterest Lego cakes for my nephews birthday. I think it went well! There are some things I would have done differently after all the trial of it, but for my first time assembling a Lego cake of any sort it looked really good. It was actually pretty easy and can be done fairly cheap. I ended up making two cakes, one a 9" by 9" double layered cake(which was the more expensive) and a Lego head (probably the more fun of the two to make). For this post I'm going to focus on the Lego head since there really isn't too much to say on the layered cake; there really is no right or wrong way to do the cake. Onwards to the Lego head!

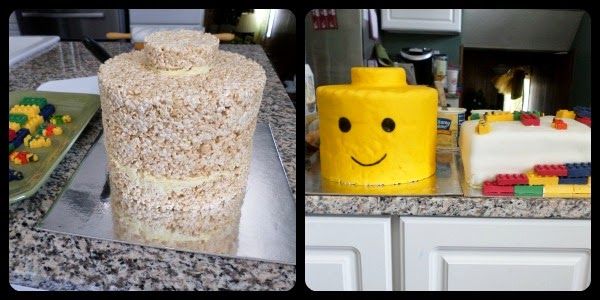
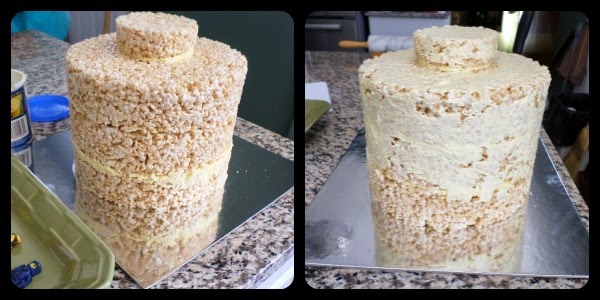
  This guy took took a little over 3 batches of rice crispy marshmallow treats, one package of Wilton's yellow fondant and butter cream frosting. 


To get the shape each batch of the rice crispy mix was pressed into an 8" circular cake pan. Make sure to butter the pan before pressing in the mix so you can easily take it out once it has set (we put each layer into the refrigerator so it would set faster). Pressing in the rice crispy mix may be a bit of a work out but when following directions for the mix off of your marshmallow bag or box of cereal you can fit the entire batch into one cake pan. While you're pressing it in make sure that you are creating a flat top so stacking the layers will be easier. The top layer was made with a much smaller batch of the rice crispy mix(I guessed on the amounts) pressed into a cookie cutter.

A thin layer of butter cream frosting should be used in between each layer of rice crispy treat(3 layers in all not including the small top). The frosting will keep each layer securely in place. Your next step is to cover the entire head in more butter cream frosting. Make sure to use a lot of frosting so you can smooth out the edges. I used just enough for the fondant to stick to and it ended up showing off the uneven surface of the rice crispies. 


Next up is your fondant. Wilton's yellow fondant is the perfect color for a Lego head and is easy to use. Roll out the fondant on a surface covered lightly with powder sugar to prevent it from sticking; do not use flour, powder sugar is in their instructions and it won't cost you the flavor of the fondant icing. If your rolled out fondant doesn't quite covered the Lego head that's okay! Using the fondant tool to smooth it out over the cake you'll be able to spread it out to cover all surfaces and will most likely be trimming fondant off around the bottom of the Lego head. If you don't have enough butter cream icing your fondant will get an uneven surface from the rice crispies instead of a nice, smooth surface. If you can't make the surface perfectly smooth that's okay too - children are going to treat it like the most magically thing to ever happen in the history of the planet. Some adults will too.


When your fondant is done and has had some time to set(shouldn't need too long) it's time to give your Lego head a face! We weighed our options with how to do this from getting black icing to using edible colored sheets cut out for the face pieces but we ended up sticking with food coloring markers. This was probably the best way to go since it made it look a little bit more like a Lego piece; no icing or colored sheet pieces sticking out from the surface of the Lego head. This also is the easiest option and allows you to copy any Lego head you want. We stuck with the original style and I was able to make small adjustments so it would be more even and correctly sized. 


When completed the Lego head was fairly large - about the size of my head. The other Lego cake pictured was made with 2 boxes of cake mix done in a 9" by 9" pan(one for each layer). It has butter cream frosting in between the layers as well as over the cake and was topped with a box Wilton's white fondant. I ended up using too much butter cream frosting and had to clean it up around the base of the cake after I was finished smoothing out the fondant. There is no special order to the brick layout; I made sure to put my nephew's age on the top and then randomly laid out the rest of the bricks.  You can use either butter cream frosting or melted chocolate to hold pieces in place(they will not stick to fondant without extra icing or melted chocolate).


The Lego bricks and people made for the cake were probably the most expensive part. They're made with white chocolate set in brick molds. All of the colors were available at the store so we didn't have to use food color on any melted chocolate and when the Lego people had time to sit (the chocolate bricks and people were all made the night before the cake was decorated) I was able to use the food color markers to decorate them. Yellow was the best option to make them with since it both matched the color of Lego people as well as was the easiest to draw on. They will melt in your hand though so if you have to pick them up to color on them you'll need to do so quickly. The molds for each can be found online at Amazon.    

Friday, February 6, 2015

Trial ~ Ice Candles

I decided to give Ice Candles a try. They are rather easy to make and chances are you already have everything you need to make them at home. Instructions for them can be find easily online, though I originally learned about them from a candle making book at my local library(which I will update with the title of that book later). 

You can buy wax for these, pillar waxes are the best way to go, or you can use candles you already have at home. I opted for a couple of candles I had purchased several months ago. I like their scents and I loved the containers they were in, but I wasn't too fond of the way they burned(it was very uneven and their wicks were too smokey) so crafting fodder they became! 


Supplies needed for this project:
  • Cardboard container that can hold liquids(milk or juice boxes work out well)
  • Wicks, one for every candle you make(larger/wider candles may need more than one wick)
  • Pencil/chopstick/something to hold your wick, you may have to get creative with this if you are using pretabbed wicks(I have metal bars for mine since I use pretabbed wicks)
  • Wax or candles to be melted down
  • Ice cubes
  • An old pot for boiling water
  • Kitchen towel or pot holder 
  • Wax paper(optional)
  • Paper towels(optional)

Start with prepping your containers; your milk or juice box needs to be cleaned thoroughly. If you can't get it completely dry after cleaning that's okay, you'll be filling it with ice later that will be melting so a few drops of water won't be an issue. When your containers are ready set up and center your wicks. You can adjust the wicks later when you add ice since you'll need to add it around the wick. I used one of my pillar molds in addition to a milk box to see how different the candles will turn out. In addition to giving the metal mold a try I also set these up on top of wax paper - pillar molds have a hole in the base(basically they make pillar candles upside down)for the wick and if it's not closed up well with tape then the contents will leak. The wax wasn't an issue but I did have a small water leak when the ice melted in the candle.

Your next step is to melt down your wax. If you purchased new wax you'll need to get something to melt your wax in that will fit inside of your pot of water. Bring your water to a boil(it doesn't need to be a rolling boil) and set your candle or wax pot inside of the boiling water. You can turn down the heat on your stove once the water has reached its boil since it should maintain its temperature long enough to melt your wax. If you're using an old candle don't forget to take out the wick once the wax melts around it - you don't want to pour a half burnt wick into your ice candle. 

When your wax has melted(or is very close to being completely melted) then you will need to add your ice to your molds. Don't add the ice until just before its time to pour the wax; you don't want the ice to melt before the wax has gotten to it. If you're using a candle in a jar and not a pour pot with a handle on it make sure to use a kitchen towel or a pot holder when pouring your candle. Boiled water and hot wax hurt. When pouring your wax you don't need to worry about avoiding direct contact with the ice, I made sure the wax hit the ice first.

With the wax poured now you wait for your candles to harden. This won't take as long since there is ice inside of the candle to chill and harden the wax but you still will want to give it a few hours to make sure the ice has completely melted. The metal mold here had the candle completely set in under an hour; the metal itself was chilled from the ice and it ended up prolonging how long the ice took to melt. The cardboard mold took at least 2 1/2 hours for the candle to set and the ice to completely melt. 

Your candles should come out easily from their molds; I had no issues taking mine out. You will need to pour out the water from the ice, which I was able to get most of it out before taking either candle out of their mold. The shapes in the candle wax all come from the shape of the ice, so it was cool to see my bone ice try had at least one good bone shaped hole in my candles. 


And there you have it, Ice candles! Apart from the bone hole, I actually wasn't pleased with how these came out. I was expecting more holes but the outside of these candles look pretty solid. Even though these didn't come out looking like I had hoped they would, the project was so easy and didn't require a lot of effort on my part so I'm probably going to give it another go at another time.


One last picture - this is a great example of how not every candle container can be put in boiling water for wax removal, not all containers handle it the same. The green jar was from the same company that this one was from but the green jar had no damage to it where as my purple jar successfully lost almost half of its coloring. While I can't use these for a home decor I wanted, I can still get crafty with them in the garden or get crafty with them for other projects. Crafters beware when cleaning out your candle jars!


Wednesday, February 4, 2015

5 Tips for Candle Care

These are just a handful of tips to prolong the life and use of your candles. While my experience is working with soy and bees waxes, these should be consider for candles of any wax type. If you're spending a lot on your favorite candles, why not get the most out of them? 

1. Trim the wick 

We've all been told this, make sure to trim candle wicks to 1/4" before burning, and this tends to be printed on candles' warning labels, but what's the point of taking scissors to your candle? It's flame control right off the bad. A longer wick is going to create one cool looking, flickering flame on top of your candle. And the size of that flame is going to burn up more wax than it otherwise would have if the wick had been trimmed, which in turn can take away hours from your candle's expected burn time.

Bad guy flame aside, trimming the wick of a candle doesn't stop with the first burning, it should be done beforehand or at least considered every time you intend to light your candle. Wicks are not all created equal and they will not be particularly interested in burning equally. If the wick burns well you probably don't need to grab the scissors, but if you find that it has burnt wick collected on top of it, trim that off. Not trimming it chances the return of bad guy flame as well chances contamination to the wax should it find itself in hot wax(instead of burning off). This, however, may not be quite an issue if your candles are not intended for decor in your home, but if they are consider that chunks of black soot may not create quite the present you intended with your candles.

 These wicks were the same size are the same brand, but one ended up burning better than the other, whereas the other managed to alter the color of the wax he dug himself into while it was hot. What a jerk.


2. Never blow out, snuff out 

With the consideration that when one blows out a candle they may or may not be inadvertently spitting at the same time(hooray birthday candles!)aside,the idea that snuffing out a candle versus blowing it out actually makes some sense. While I'm not a fan of using my fingers to snuff out a flame, because that sounds painful, I am a fan of the idea that candle snuffers are a helpful tool to have at home, especially so for those of us who enjoy having candles around. A candle snuffer doesn't need to be fancy or pricey, it just needs to get the job done. So why snuff out candles? 

When you blow out a candle and find the flame popping back up as though nothing just happened between the two of you it's because that flame still has access to the oxygen around it. A candle snuffer takes oxygen away from a candle's flame, and puts it out quickly. As a bonus they also take on the task of controlling smokey wicks. When purchasing a candle snuffer it's good to consider getting one with an end that moves so it can reach a candle flame inside of any taller containers. 

 
3. Uncover when in use, cover when not in use

Covering candles that are not in use is fairly simple; if you candle came with a lid covering or box or the like using these for candles not in use is going to do a good job of keeping your candles clean and free of things like dust or rogue hairs. If the idea of tucking candles safely away from the risky elements of your home is tedious sounding or off putting when you probably have more interesting things to do I'm probably, for the most part, on board with you(sorry exposed candles). So onward to candle toppers intended to be used with burning candles.

Thanks to sites like the Pinterest we have plenty of options for how creative packaging can be for candles, which is especially handle for things like weddings. Consider though how well a candle and the ideal container of choice for that candle might pair together. Using the ever popular rustic go to choice for everything from weddings and events to home decor, mason jar candles are a pretty pleasing pair up. Visually. 

Mason jars tend to hold up well with burning candles, they can be decorated well for most themes and for a lot of people they are a pleasing choice to have around. The extra bonus to them is we now have lots of options for our lids and die cut lids don't look half bad, but they do pose an issue for burning candles. They do a great job of snuffing out burning candles. This however may not be the case for all candle sizes and die cut lids don't speak for all decorative candle tops. 

There are some nifty options for making your jar candles more decorative; ceramic and metal candle shades are a great choice and are designed so they do not necessarily cut off air flow to candles. There are also a small amount of sizes available specific to what size and style of candle you want to use. And to be fair die cut lids shouldn't just receive a bad rep, you can still use them with burning candles. While a mason jar filled with a candle is most likely out of the question with die cut jar lids, tea lights set in a 12 ounce or a 16 ounce jar topped with a die cut lid will still look as pleasing as any other jar candle. 
 

4. Pay attention to how the wax melts

The way the wax melts while a candle is lit is an easy indicator of whether that candle is on a level surface or if the candle's container is not level itself. Catching an uneven burning early can make for an easy fix if the candle just needs to be adjust where it's sitting. Finding it well after repeated uses is probably a sign that the container wasn't meant to be, or that particular candle is one you may not want to buy again. But if you want to buy it again unburned wax in jar candles that have burned through their wick is easy to salvage and not let go to waste. It'll depend on the shape of the container for how you can get it out.

If you can reach your hand into the container then an easy remedy for collecting the left over wax is to place the container in your refrigerator(place in your freezer if you don't want to wait as long). When both the wax and container are thoroughly chilled you should be able to pop the wax out of the container. If the container just has a small amount of wax you want to clean out so you can reuse said container, this will be the easier method of getting wax out. 

The alternative is to heat up the left over wax. To do so a quick way to heat up wax is to treat its container like a double broiler. Bring a small pot of water to a boil and place the container inside the pot. When the wax has melted it can be poured out, but keep in mind that just because you could burn a candle in it does not all candle containers can handle water boiling at 200° or more, and an extreme change in temperature will easily break glass. An alternative to the double broiler way is to get a small hot plate intended specifically for candles.


5. Storage can make a huge impact

When deciding where to store your horde of candles for safe keeping and/or hiding, there are certainly some things to consider. Ideally candles not being used, or extras that were a stock up via sales, should go somewhere dark and cool, i.e. a linen closet, pantry, cabinet storage. I hesitate to suggest areas like basements because you want places to store your extras that are in temperature controlled areas of your home. You also want to make sure you aren't leaving them for prolonged periods of time in direct sunlight - the sun can damage the color of candles and in the summer time, or anywhere that tends to get hot anytime of the year, the heat from the sun is something you may want to steer your candles clear of. 

It's easy to gather that high temperature would be bad for something made of wax, candles can/will melt in high heat and can cause damage to the container they're in as well as offset their wick(trying to use a candle with a wick that refuses to remain upright doesn't always work out well), but did you know low temperatures can cause damage of their own? 

Low temperatures are really good at breaking candles free of their containers, even if the wax has additives to help it stick to the sides of its container, and low temperatures can also cause candles to crack. Container candles of course can be put right back in their container if the cold has broken them free but it may be necessary to check that they are still sitting level in their container to ensure that you can get an even and clean burn with them. If a candle has cracked from the cold then this may only be an issue if it was not a container candle. A crack in candle wax may be visually displeasing to see however a cracked container candle is still usable. Hot wax from a burning candle can fill in small or slim cracks. As long as the candle isn't broken through top to bottom an even burn from the candle can still be expected. 


These two are the result of being at a craft show where the building manager insisted on waiting until customers started arriving before turning on the building's heat. Because the building was more of a small warehouse set up (metal walls and roof in the show's area) there were times where the inside of the building was colder than the outside. These candles were made from the same batch of wax but they, and several other candles, all suffered the temperature damage differently. Both are still usable and the cracks in them are slim enough not to affect the way they will melt, but to be visually before their first burning they bother would have to be melted down and re-wicked. 


5 simple tips for candle care, what are your thoughts? Anything you would add or recommend? Please feel free to leave anymore tips or suggestions in the comments and thank you for reading!